How to shoot natural looking HDR in Lightroom and Photoshop
We all know those ugly over processed HDR photo’s from the internet.
More and more people don’t even watch the photo if they hear it’s a HDR.
Now how can we benefit from the technique and process natural looking HDR photo’s?
All you need is Adobe Lightroom and Photoshop. No extra plugins required!
Make your images pop!
Why HDR?
Our camera’s are not always capable of capturing the complete dynamic range of the scene in front of us.
A high dynamic range means that the scene has some really bright highlights (direct sunlight) and some very dark shadows. If we try to capture this in one exposure, without blowing the highlights (meaning they will be pure white), we need to expose for the highlights. When we do so, the shadows will be almost pure black. Leaving very little information and detail in the digital file.
If we do it the other way around, exposing for the shadows, we will have pure white in the highlights.
The solution: we shoot 2 or 3 (sometimes even up to 5) exposures and combine them later.
How to shoot HDR?
First of all, you will have to shoot in RAW.
Jpeg just isn’t going to do the trick here. It is compressed and for this we need all the information from the digital file. I never shoot Jpeg, only RAW. Only when you need to share your images directly, and you don’t have time to process the images you can set the camera on RAW + Jpeg and share the Jpeg.
Now onwards to taking the photo’s.
We shoot one photo exposing for the highlights, one for the midtones and one for the shadows.
This is called Bracketing.
Some camera bodies have this feature under a button (auto bracketing or BKT)
When you have it on your camera, you can take 3 photo’s with a spacing of 2 or 3 EV (exposure steps).
If your camera doesn’t support auto bracketing, you will have to manually take 3 exposures of the scene.
Turn your camera to Manual and take the base exposure (for the midtones). From this point you use exposure compensation (the +/- button on your camera) and dial in +2 (you will now expose for the shadows). Take the photo and there after you set the exposure compensation to -2 and take the last photo (for the highlights)
The best is if you take the photo’s with a tripod, but handheld will also be possible with the latest software.
Now we have 3 photo’s in which all the light information is stored in both the highlights and the shadows.
Process HDR
Now the fun begins. Load the photo’s in Lightroom and make some small adjustments like lens correction, color correction, white balance.
Here you see my selection of the 3 images:
HDR blending preparation
Now select the 3 images and right click on the photo’s.
Go to Edit in -> Merge to HDR Pro in Photoshop
Here you have 2 options how the process wil go, depending on your version of photoshop and Adobe Camera Raw.
It could be possible that the 3 photo’s will be opened in Photoshop immediately in layers (where they are aligned by photoshop automatically, if you took the photo’s handheld) and the HDR Pro interface will open.
Here you change the mode to 32-Bit and click OK.
Now the photo will be tone mapped and you have a 32 bit image.
All you have to do now is save the image (File -> Save) and the image will be saves and added to Lightroom, next to your 3 original images.
Or..
The 3 images will be opened in a separate window where you can select the mode: 32 bit
Click on Tone in ACR
In the next window (Adobe Camera Raw) you can alter the image but we save this for lightroom.
Just click OK, and the photo will be saved in Photoshop.
All you have to do now is save the image (File -> Save) and the image will be saves and added to Lightroom, next to your 3 original images.
Processing in Lightroom
Now we have a tone mapped image with a very big bit depth (32 bit vs the 16 bit of the original file).
You can edit the image to your liking, using your normal Lightroom workflow and your artistic vision.
Basic adjustments would be:
Adjusting the highlights
Adjusting the shadows and black point
Adding some contrast
Give some more clarity
Here are my settings for this image:
When you are happy with your final result in Lightroom you can sharpen the image and if needed do some noise reduction. This can be done in both Lightroom and photoshop.
Also maybe your image needs some retouching in some area’s (like the lens flare in my image) and some fine adjustments, I prefer to do these in Photoshop.
My image was shot with a cool appearance in my mind, so I used a bit of an extra cool setting on the white balance.
Use your own vision to tweak your images.
The most important thins is that YOU like it and the opinion of others is second to that!
So now you know: How to shoot natural looking HDR in Lightroom and Photoshop
Please share your images in the comments!
Stay tuned for more photography tutorials, please subscribe to the newsletter to get them right in your mailbox!
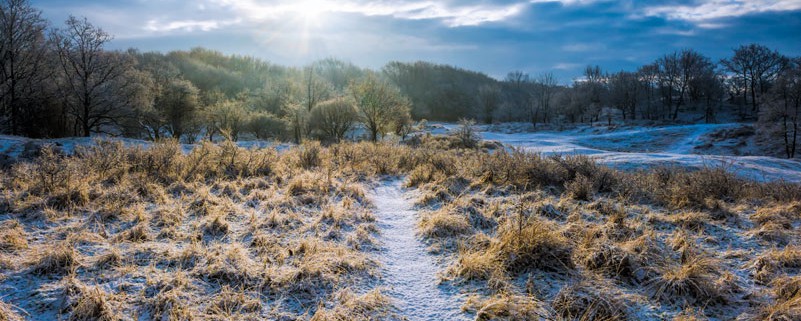
Here is the final version:
Leave a Reply
Want to join the discussion?Feel free to contribute!